Winter truly is on its way. It has been very cold with lots of rain for the last week, the cold I don’t mind as you can wrap up warm with a hot drink, some fluffy socks and get all cosy, the rain however is quite depressing.
The one thing all this bad weather has reminded me off though is that my favourite time of year is not far away… HALLOWEEN! I love Halloween and wish it was celebrated a bit more in the UK. Regardless of this I cannot wait and figured what a great excuse to finally start looking at my crochet to do list again (as if I really needed an excuse!).
I have compiled a list of my top projects to make for this Halloween (or any Halloween).
Nearly all of these have free patterns for them, however there is one or two that are Etsy buys and such like, I’ve included them purely because I think they can probably still be made just looking at the picture without buying anything.
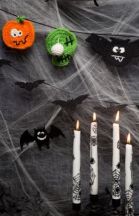
 Bats – Theses are great for decorating your house especially if you plan to have a party this year. You can hang them with some yarn from anywhere. This is a free ravelry pattern.
 Boo Ornament – Again this great for decorating your home ready for a party, or if you have a front facing window then why not pop it in there. This is a free downloadable pattern.
 Boo Necklace – I love this and would happily wear it on Halloween myself. Its an etsy buy but I can see two ways of doing this, one is to crochet around some wire so it bends or alternatively crochet in a flat line and then bend and sew them with black thread to keep it in place. I am going to give this a go at some point so I will let you know how I get on.
 Count Dracula – How cute! A little amigarumi vampire, cant get much more Halloween than that. This is a free Lion brand yarn pattern.
 Eyeballs – Urrrgghhh eyeballs…. I see these laying around on a buffet table at a Halloween party. Sadly there is no pattern for these but I couldnt leave them out as I’m sure some of you out there are clever enough to work these out.
 Halloween party banner – How cute and funny are these little monsters. I love that this pattern includes the bat, Frankenstein and pumpkin. I know I keep saying it but party decoration! If I made this I would probably have it in a window as well. This is a free Red Heart pattern.
 Halloween Garland – This a different version of the previous banner, you get instructions on how to make a ghost, Frankenstein and pumpkin but these ones are stuffed. It also shows you how to make the twisted string. I love that beads and such like have been included. This is a free pattern.
 Wreath – This is such a simple and quick way of creating a wreath for your door this Halloween. I would be inclined to make some of the appliqués from the Halloween party banner above and sew them on for decoration as well.
 Jack Skellington Hat – Sadly another one with out a pattern however all you need to do is make a basic beanie hat in white (like this one here), make two circles in black attach them and then using a needle sew on the nose and mouth with more black yarn.
 Halloween Monsters – There is whole collection for this one. You can get a spider, witches hat, pumpkin, tombstone, owl, skull, bat, ghost, mummy, witch, and many many more all completely FREE. They are available from Lion brands website. The Mummy is my favourite.
 Colourful Monsters – Another without a pattern but these are super simple to make. Crochet a circle to be the diameter you want, obviously the bigger the circle the larger your monster will be, once you have the desired size circle keep crocheting in rounds with the same amount of stitches until you have a tube with one end sealed (again stop whenever you are ready). Do a sharp decrease to close the end so that its quite flat on the bottom and lastly decorate with googly eyes and felt teeth!
 Pumpkin Garland – If I had some orange yarn in any shade other than neon I would be making these right now as they are adorable. Being the ambitious person that I am though I would love to crochet around the string of some LED fairy lights and then make the pumpkins around bulbs (LED’s don’t get hot like normal fairy light bulbs so wont pose the same fire risk).
 Skull Appliqué – This is the last one that doesn’t have a pattern, however I have already given it a go myself and you can find the pattern over on my patterns page here.
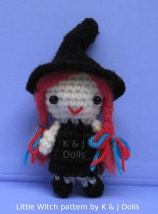 Witch – This little amigurumi witch is just too cute not to include. Its a free pattern that has pictures throughout to help.
 Zombie Phone case – This is my favourite pattern that I found. If I had some fluffy yarn I would certainly have made this by now. I also need some beads but that is besides the point, this little fella is awesome. You get right into the spirit of Halloween every time your phone goes off.


